Thursday, June 28, 2012

Anthro Knock-off: Cut Lace Carryall

I have been drooling over the white Cut Lace Carryall from Anthro for weeks now. The price tag isn't insanely excessive, but it's also not something I feel comfortable forking over when I'm *trying* to save. When you're like me and adore just about everything outside of your price range, you have to get creative. As they say, imitation is the best form of flattery.


The $198 original via Anthropologie:

I searched high and low for suede, leather, or vinyl that had the laser cut lace details that the original had but came up empty handed. After a dozen or so Google searches for vinyl lace, I came across a cute little store, Darlybird. Can you repeat after me... Uh-May-Zing. Seriously, amazing. It took all of my self-control not to buy everything I loved (which was practically the entire stock) but since everything was such a steal, I let myself get three things guilt-free: vinyl lace placemats, washi tape, and uber cute labels.


If you were going to make this you could use a rectangular doily or scraps of actual lace (both of which I considered) but I wanted the matte look of the original which I wouldn't have gotten from flimsy fabric. I love the look of the finished bag. It's perfect for summer and will be great next spring as well.  


What you will need:

  • One yard of canvas or any other fabric of your choosing (consider using oil cloth or laminated cotton for a completely wipeable bag)
  • 2 vinyl placemats from Darlybird
  • 1.5 yards of rope for the handles
  • Steam-A-Seam iron-on adhesive
  • Coordinating thread
  • Sewing essentials
  • Iron & Ironing Board

Follow the instructions at Dana Made It for the Boxed Out Tote
I followed that tutorial to a T (put in a pocket and all) but this is what I did differently:

  1. After cutting out the canvas pieces using the placemat as a guide, completely finish off the top edge as you will not sew through the top of the vinyl. 
  2. If you are adding a pocket do so at this point
  3. Attach the handles
  4. Place the Steam-A-Seam between a layer of vinyl and a layer of canvas and on the hottest setting, bond the two wrong sides together (if your fabric has a wrong side)
  5. Now use the tutorial to make a tote out of this bonded fabric
  6. It's completely optional to box out the bottom of the bag, but to me it looked like the original had a base so I wanted to do it on mine as well.
If you like what you see, consider following Spool and Spoon for other DIY projects and recipes!

I'm linking to:


Wednesday, June 27, 2012

Hazelnut Ganache Pops

Who doesn't love Nutella? I sure do. It's rich, creamy, and such a treat. Then again, it's much too sweet for me to smother a piece of toast as the label would suggest. Like all good things, it's best in moderation. That's why these little pops are the perfect treat. Rich nutty goodness in a tiny little package.


What You'll Need (makes about 25 pops)
  • 1 1/2 cups of fine (dark or milk) chocolate, chopped
  • 1 cup nutella
  • 1/4 cup  and 2 tablespoons of hazelnuts, divided
  • 25 candy cups
  • Optional: Lollipop Sticks & Double-Boiler

Directions:
  1. Preheat oven to 450 degrees
  2. Toast hazelnuts in a single layer for 5-7 minutes
  3. Using a double boiler over medium-high heat, melt the chocolate chunks and stir until smooth and glossy
  4. While that's melting coarsely chop the cooled hazelnuts (or use a food processor)
  5. Mix the Nutella with the melted chocolate until combined
  6. Stir in 1/4 cup of chopped hazelnuts to the chocolate/Nutella mixture (try not to resist eating it all write out of the bowl)
  7. Pour mixture into fluted candy cups, fill about 3/4 of the way up
  8. Top with the rest of the toasted hazelnuts
  9. OPTIONAL: Once set (will be the consistency of fudge) insert lollipop sticks

These are delicious on their own, but are even better when used as coffee or hot chocolate stirrers (if you don't mind pieces of hazelnut at the bottom of your cup).

Enjoy other Nutella treats at "One Artsy Mama"


Like what you see? Consider following Spool and Spoon for other great recipes and DIY projects.

I'm linking to:

Tuesday, June 26, 2012

Bay Breeze Popsicles

If you liked the Coconut Mango Margarita Popsicles, you're in for a treat. I love me some fruity cocktails, and as much as the Mr. would like to deny it, he does too. These Bay Breeze Popsicles are delicious and chocked full o' fresh fruit... that makes them a healthy alternative, right?


Rather than make these with alcohol, I opted for a virgin option. Three ingredients, some time to freeze, and you're done. If you wanted to add vodka, keep it at a minimum or they will have a difficult time setting properly.

Ingredients
  • 2 cups of chopped pineapple
  • 1 cup of 100% cranberry juice
  • Lime slices
Process:
  1. Blend until frothy and smooth (about a minute)
  2. Slip some lime slices into the molds (1 per popsicle)
  3. Pour into popsicle molds or Zoku
  4. Let set for 4-6 hours (molds) or 5-7 minutes (Zoku)
There you have it. It's that easy. I dare you not to enjoy these juicy delights.

Like what you see? Consider following Spool and Spoon for other great recipes and DIY projects.

I'm linking to:

Saturday, June 23, 2012

Stars and Stripes: Grand Finale Table Runner

Thanks to the Mr.'s dad, we have an chic white dining room table. It's the perfect blank canvas for everything from delicate salt and pepper shakers to pretty table runners. We've got quite a few (runners, not shakers), but we were lacking one with July 4th flair. I had considered using some striped and starred fabrics, but since I look forward to seeing the fireworks every year I thought this would be a different take on All-American. 


Materials:
  • Raw Canvas (length of table + 2 feet) -- use an existing table runner as a guide
  • Pencil
  • Pinking Shears
  • Acrylic Paint
  • Fabric/Textile Medium
  • Iron
  • Round Paint Brushes (various sizes)
Directions:
1. Take your existing runner and lay it over the canvas to act as a template

2. Using your pencil, draw a line running parallel to the runner on the canvas with about 3/4 of an inch between them

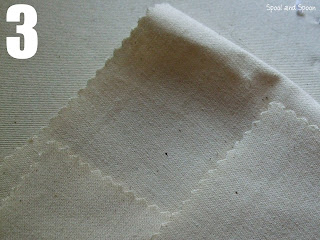
3. Cut ALL edges with pinking shears, be sure to cut away from the pencil markings. (I chose not to do so, but if you'd like, you could stitch all the way around in a matching or contrasting thread to further prevent fraying)

4. Iron out any prominent wrinkles
5. Mix fabric medium (2 parts) with acrylic paint (one part) and paint various designs/shapes/colors to emulate fireworks. While I seem to stain everything with acrylic paint and cannot believe that it would ever wash out, going the extra step with the fabric medium ensures that despite any stains or spills, the runner will be perfectly washable.


6. Let dry for 24 hours, then set the paint with a hot iron or a toss in the dryer AND YOU ARE DONE.

Like what you see? Consider following Spool and Spoon for other doable projects and recipes.

Wednesday, June 20, 2012

Coconut-Mango Margarita Popsicles

Happy First Day of Summer! 


Not only is it the longest day but it just so happens to be the hottest as well. Ugh. You know it's gonna be bad when the "low" for the day is EIGHTY degrees. Unlike the Mr., I'm a wimp and do not tolerate the heat/humidity well. That's why today's treat is a perfect way to cool down while you usher in sticky summer nights: Coconut-Mangorita Popsicles. Does that sound summery or what?? Yep, I thought so, too.


Coconut-Mango Margarita Popsicles (makes 6)
What you need:
Popsicle Molds (or your handy-dandy Zoku if you have one)
Blender
1/2 can of coconut milk
1 fresh mango, chopped
1 cup of Virgin Margarita Mix (Jose Cuervo light is perfect)
2-3 Tablespoons of Tequila (too much, and it'll be practically impossible to freeze)

How you do it:
1. Put all ingredients into blender
2. Blend together for about a minute until very smooth
3. Pour into mold and let set until solid
          - In the Zoku it took a whopping 10 minutes, but the average popsicle mold will take 4-6 hours
4. Enjoy!

{pardon the poor quality photos but the sun was practically gone and it's no easier to take a good picture when your specimens are melting uncontrollably}

I'm linking to:

Sunday, June 17, 2012

Stars & Stripes: Wooden Flag Art

Last weekend as I was browsing HomeGoods, I found the cutest gnome ever tucked on a random shelf. As I eagerly scooped him up, I noticed a distressed patriotic frame on the lower shelf. It was perfect for the summer holidays with it's flag motif but I had no use for yet another frame especially one that I probably wouldn't use so I walked away. Later on that night, I ran across this Painted American Flag at Pottery Barn and figured it was a sign from above; both pieces served as the inspiration for my first Stars and Stripes project for the 4th of July: Wooden Flag Art.


Materials:
  • Finished Wood Slab (I used a 6"x8"x1" cutting board. But if you want to replicate the monumental size of the PB piece, just use something larger)
  • Painters Tape
  • Rotary Cutter
  • Acrylic Paint (Plaid's Satin Cream, Crimson, Barn Red, and Too Blue)
  • 1" Bristle Brush or Sponge Brush
  • Sand Paper
  • Star Stickers
  • Sepia Decoupage Finish


Procedure:
1. Sand lightly and then coat with 2-3 coats of cream paint; allow brush strokes to show

 2. Cut painters tape to cover all areas that need to remain white (the stripes and the top left portion for the stars). We only had 2" painters tape handy so I cut the strips 2/3 of an inch wide with my rotary cutter for the stripes. For the stars area, I overlapped tape to form a 3" x 3.5" rectangle.

3. Cover the areas as shown below. Apply firmly, but do not press too hard, you actually want the paint to bleed a little bit.

4. Mix the two reds in equal parts and paint all of the exposed areas

5. Remove tape and apply star stickers. (Don't count mine... I definitely couldn't fit 50 on there)

6. Affix the tape to create boundaries for the blue paint. Apply the blue in 2-3 coats.

7. After the paint has dried, remove the star stickers. Don't worry when it gets a little messy, that's exactly what you want. Tip: Use tweezers! (If you though applying them was the time-consuming part, this trumps that easily. This took forever -- You can see all of the teeny tiny pieces of stickers in the back and only 5 came off in one full piece.)

8. Use sandpaper to distress the edges and finish. This is optional but I think it made all the difference.

9. If the colors are too bright for you (they were for me), add a coat of sepia decoupage finish. It dulls the colors and "dirties" it up just right.

Here it is on display in my craft room with other red, white, and blue goodness.

Like what you see? Consider following Spool and Spoon via Google Friend Connect or by email.

I'm linking to:

Thursday, June 14, 2012

Anthro Knock Off - Callais Earrings

Who doesn't love Anthropologie?? Considering how beautiful, unique, and often ethereal all of their products are, I can't imagine that there is a single woman out there who doesn't swoon. I ran across these beauties (the Callais Earrings) and fell in lust. They're stunning and so perfect for summertime but for $138 they are a splurge, and not one I was willing to take. What's a girl to do? Why make them of course.

Pretty, right?? And even better yet is the fact that they cost me only $8! Yep, eight smackeroos.


I ran by Target on my way home and picked up a pair of plain gold earrings ($5.99) and two packs of beads from AC Moore ($1.50/each + 40% off coupon). Other than that, you will only need hot glue and tweezers.


The process was pretty simple. Apply glue in a crescent shape, affix larger stone beads first then fill in with the tiny seed beads. Let dry and you're done. It took me all of 5 minutes to make a pair. I love them and can't wait to wear them tomorrow.

Like them? If so, this will quite possibly be the easiest DIY you ever undertake. Let me know if you make a pair too!


I'm linking to:

Wednesday, June 13, 2012

Burlap Dry-Erase Calendar

I don't know about you, but our summers are jam packed with BBQs, birthday parties, day trips, weddings, vacations, and baseball games -- you name it, we gotta do it. This time of year is when we start double booking our weekends or forgetting plans we already made. A communal calendar in the kitchen is exactly what we needed to stay on track. Considering that our kitchen will be getting remodeled soon (wooo!!) and it'll have a rustic cottage-y feel when it's all said and done, I wanted something that would fit for the long run. 

This dry-erase calendar is now our saving grace!
Cute, right??

Materials:
Calendar Template (download mine here)
Adequately-sized Frame
Burlap (about 13" by 13")
Linen Scrap
White Twine
Tacky Glue

Process:


And the finished product... Tah dah!

Simply write on with a dry-erase marker and you're ready to go!


I'm linking to:

Saturday, June 9, 2012

Aloha, E komo mai!

It's officially summertime and yet I still had the same wreath on our door since January.... Whoops. I had considered making one of those cute patriotic rag wreathes (shown here) but thought something a bit more colorful would be just what the porch needed.


I absolutely love how it turned out. I hadn't planned to add the sunglasses or flip-flops but it looked like it was lacking something and I think they were the perfect touch. Doesn't it just scream SUMMER?! Well, maybe it actually says something along the lines of "Aloha, E komo mai!" or welcome to our home. I feel like I need a Hawaiian vacation now...


I started with a plain 18" willow wreath form from Dollar Tree and painted it Caribbean Blue with acrylic paint. You could skip this step, but I think the raffia and blue have a nice contrast. I cut the lei apart and layered the flowers and umbrellas around the base then used tacky glue to attach them. My wreath is behind a glass door and under a porch so it's safe from the elements. If yours wasn't, I would recommend hot glue. Afterwards, I attached a raffia bow. At first, this was where I ended. Then I ran out to Target and in the dollar section found the sandals and sunglasses which were exactly what it needed. I attached those with hot glue and voila! A bright, Hawaaian summer wreath!


Whaddya think?
I'm linking to:
Related Posts Plugin for WordPress, Blogger...